Part #RWBK555712
STEPS: READ THESE INSTRUCTIONS CAREFULLY!
IMPORTANT: THE ORIGINAL WHEELS MAY NOT FIT. PLEASE MAKE SURE TO CHECK WHEELS BEFORE ASSEMBLY, THIS WAY YOU WONT BE DISAPPOINTED IF THEY DO NOT FIT.
- Jack rear of vehicle and support the axle with jack stands.
- Remove the wheels, brake drums, axles and backing plate assembly.
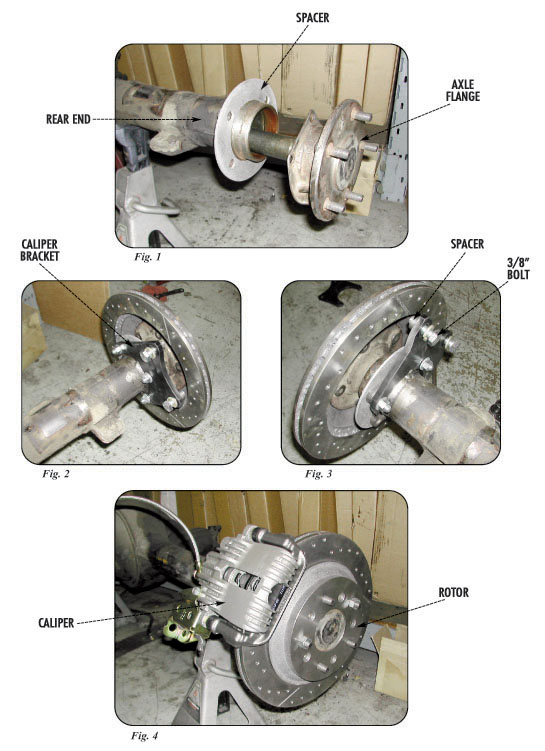
- Clean and prep the mounting flange area of rear end.
- Reinstall the axles.
- Mount the caliper bracket onto the inside of the axle flange using the supplied bolts. (Note: the brackets should face the rear of the vehicle and bend towards the outside of the vehicle.
- (Secure the rotor to the axle by using two of the lug nuts you took off). At this point install the calipers and check for clearance.
NOTE: YOU MAY NEED TO USE SPACERS BETWEEN THE CALIPER & THE CALIPER BRACKET TO GET PROPER CLEARANCE. THIS IS NORMAL DUE TO AXLE FLANGE VARIATIONS. NOTE2: IN SOME CASES THE AXLE FLANGE MAY NEED TO BE TURNED DOWN SO ROTOR WILL FIT OVER IT. THIS CAN BE DONE WITH A HAND GRINDER, BUT IT IS RECOMMENDED YOU TAKE THE AXLES TO A MACHINE SHOP. - Once proper clearance is obtained, be sure to torque all bolts. Mounting bolts need to be torqued to 50ft/lbs. dry or 35ft/lbs. lubricated. Caliper bolts should be torqued to 55 ft/lbs.
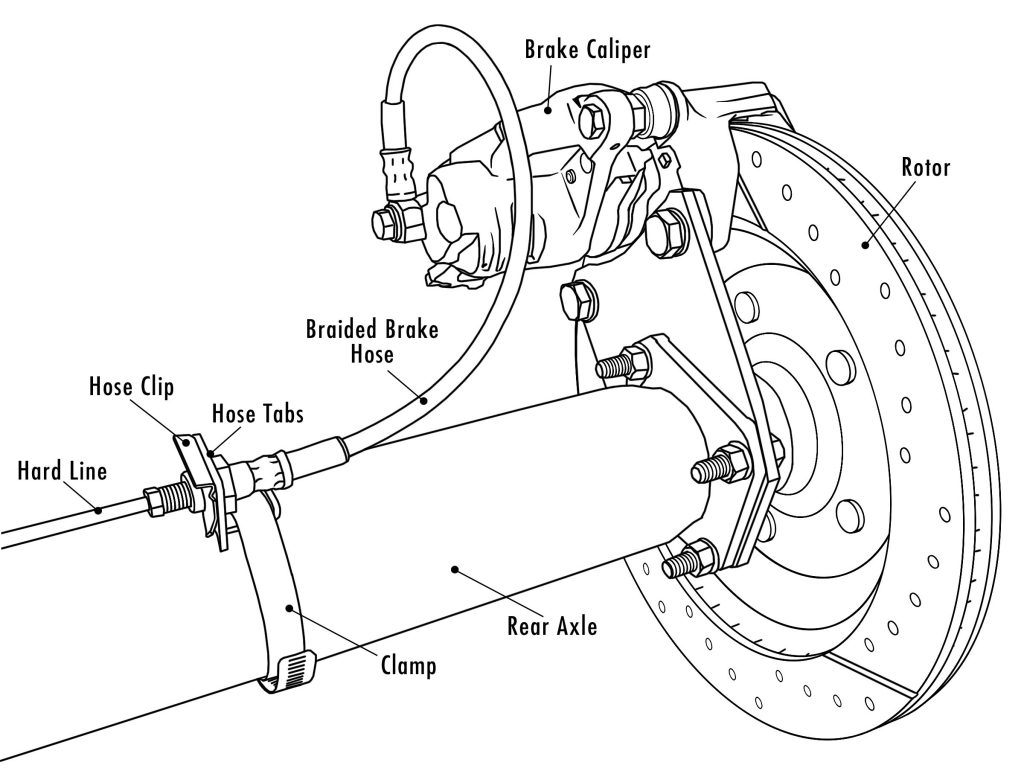
- Install brake hose. Double check all parts for interference and bolts for tightness.
- Install emergency brake cables. Make sure the end with the rectangular slot mounts fully onto caliper lever. Due to manufacturing variances you may need to fit the E-brake cable to caliper lever! (Proceed to bleed brake system).
RECOMMENDATIONS
- We highly recommend that you upgrade to a power brake booster assembly. The kits are available in 4 wheel disc configurations, Call for Details!!
- We also offer disc brake master cylinders proportioning valves and master cylinder adapter brackets for those who do not want to run power brakes! Call for Details.


