- Jack up the car and support it on sturdy jack stands. Remove the drive shaft, e-brake cables and rear axle assembly including leaf springs and shocks. If the brakes will be reused, the lines can be left connected to the backing plates depending on what type of axle will be used. Remove the rear section of the exhaust system.
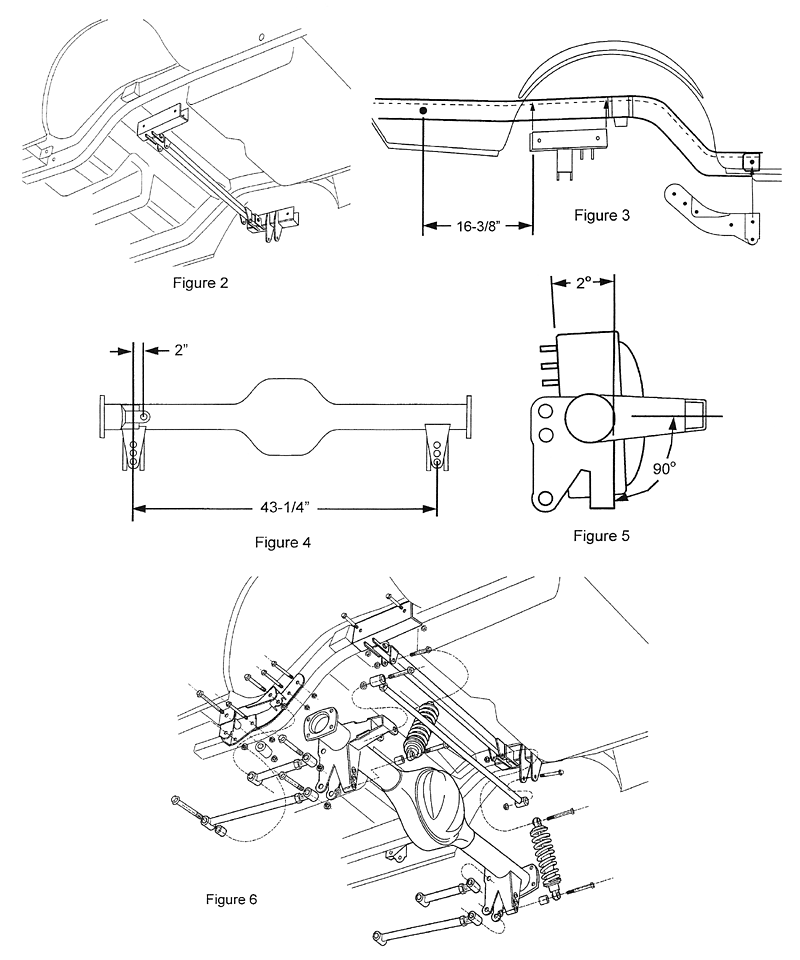
- Assemble the top crossmember with the end saddles using the 1/2″ bolts and nuts supplied, as shown in Figure 1. Leave the bolts loose, as the width will need to be adjusted to fit the frame rails. Install the top crossmember assembly up onto the frame rails under the floor, see Figure 2. Be certain that the bottom of the “U” channel is firmly seated against the bottom of the subframe rail. The crossmember is oriented with the panhard bracket on the passenger side, and is located with the back edge 16-3/8″ from the center of the rear spring shackle hole, as shown in Figure 3. It may need some trimming of the front edge to get it into that location, as the placement of the bottom out snubber brackets on the frame rails varies from the factory. Drill the 1/2″ dia. holes through the factory frame rails using the crossmember end saddles as templates and bolt securely in place. Tighten the bolts holding the crossmember to the end saddles.
- Install the front link brackets next. They are inserted in the front leaf spring pockets on the front factory frame rails, and locate using the front holes on the front leaf spring mounts, see Figure 3. Drill 1/2″ holes thru the factory frame rails and bolt the sides of the front mounts using the reinforcement plates in the inner side of the rails. See Figure3. Make sure to install the 1-3/4″ x 1-1/4″ spacer through the large hole into the inside of the factory frame rail. Secure with 1/2″ bolt. See figure 6.
- If you are installing the 4-link and panhard brackets on your own housing, they are located 43-1/4″ apart. They are centered equal distance fom the outer ends of the housing, not from the center of the third member or pinion yoke. See Figure 4. The panhard bracket is positioned as shown in Figures 4 & 5. The pinion angle should also be built into the bracket positioning. If you purchased an axle housing from HEIDTS, the brackets are already installed with a 2 degree down pinion angle. You can then fine tune the angle to match your engine. See Figure 5.
- Install the link bars with the adjusters to the rear into the mounts in the front frame brackets. Position the rear axle housing in place and install the bars into the brackets on the housing. Use the 5/8-18 bolts and nuts included. Assemble the coil springs onto the shock assemblies and install them into the upper mounts using the 5/8-18 x 2-3/4″ bolts and nuts, and onto the housing using the 5/8-11 x 7″ bolts, spacers and nuts supplied. Now install the Panhard Bar using the 1/2-13 bolts and nuts supplied. Adjust the Panhard Bar to center the housing. Adjust the link bars. The upper bars will position the housing, and tones will set the pinion angle. Figure 6 shows this assembly clearly. Install the 3rd member, then install the axles and brakes. Connect the brake lines and bleed the brakes and then install the drive shaft and emergency brake cables.


